Нова українська школа: методика навчання англійської мови в 1-2 класах закладів заглобальної середньої освіти на засадах компетентнісного підходу - Карпюк О. Д. 2020
1. In the Primary Classroom
Part II. Helping Tips
Roles that teachers have in the young learner classroom
As any teacher of young learners will tell you, you have to wear multiple hats to make sure that effective learning takes place in the classroom. Here are 10 roles that help you make a difference in the classroom and in your children’s lives.
1 A surrogate parent
The teachers that we tend to remember as adults are not just the teachers who taught us lots of interesting facts and met all the job requirements, but those who also saw their pupils as people, and truly cared for them. Getting to know your students as well as you can and caring for them both in and out of lessons is an absolute must in the primary classroom.
2 A ’teachertainer’
It is no longer enough for teachers of young learners to be mere knowledge transmitters who teach the curriculum put together by an external entity. Teachers are expected to make learning engaging and fun. This means that many teachers see themselves as a mixture of teacher and entertainer — a ’teachertainer’ — who makes a difference to the learning process.
3 A values transmitter
Children often spend more time at school than they do at home with their parents. Because of this, schools have taken on the role of teaching children basic values such as kindness, respect, sharing, being fair and polite, caring for the environment and respecting the world around them. Remember that in many cases, children will only hear about the importance of these values from you. So make sure that they find a way into your classroom and teaching.
4 A conductor
Primary school teachers are conductors in the classroom in the sense that they control learning for each child and prompt them to make new fun and exciting discoveries. Try to encourage children to make the right learning decisions, and only step in and help when it’s absolutely necessary.
5 An organiser
Most children are very eager learners, but they are not autonomous enough to organise their own learning paths yet. Organise everything that happens in the classroom for them so that learning will become a logical and manageable process for everyone.
6 A facilitator
A primary teacher should plan lessons in a way that places the children at the centre of the learning process. This implies giving children strategies to become autonomous learners. See yourself as a walking resource, always ready to offer children the necessary language and tools to learn effectively.
7 A mirror and a mentor
Children watch our every move. They learn by the examples around them. This is why it is so important that, as primary teachers, we demonstrate the attitudes and reactions that we want our children to have in class. It is part of our role to accompany each child in his or her learning journey, and to act as a mentor who is able to challenge them at their level, thereby keeping their motivation to learn alive. Remember that children are curious by nature, so make sure you plan your lessons in such a way as to appeal to their natural curiosity.
8 An assessor
Great teachers are great assessors who are able to evaluate what children know and are already doing right. Rather than focusing on what children are doing wrong, try to focus on what they are doing right and what the next learning step is, ensuring that your feedback will make them want to come back into your classroom the next day.
9 A social worker
As teachers, we need to be aware that some of our children have complicated lives. Remember to be on the lookout for warning signs and, if necessary, to get help from professionals.
10 A form filler
There is a huge amount of paperwork that teachers need to fill in. As you fill in your learners’ report cards, remember that the parent who is going to read it is eager to know how their child is learning, to find out what they need to do next and to hear at least one heartwarming thing about their son or daughter.
Things to avoid in the young learner classroom
Good teachers teach children content, but great teachers know that they also have to teach with a heart. They know just how it is important to make children feel happy in the classroom and to 'open their learning gates'. Here are Some tips to help you avoid some basic problems in the young learner classroom.
ü Avoid being too strict!
Children need to feel safe and happy before they can learn. Being overly strict can ’shut their learning gates’ for weeks. On the other hand, being their best friend can lead to loss of control. Try to establish clear rules for your classroom and to enforce them with a kind but firm hand.
ü Avoid speaking down to children!
In order for learning to take place in your classroom, you will need to manage behaviour. Instead of blaming children or demanding good behaviour, try explaining the reason why that particular kind of behaviour is important. Building a climate of mutual trust and respect is the first key to learning in any classroom.
ü Avoid trying to control everything!
Teachers need to manage and control what happens in the classroom without becoming control freaks. Remember that a lot of memorable learning happens when teachers take a step back and let the children experiment and come up with creative solutions. Have the courage to let go and allow the children to sit in the driver’s seat.
ü Avoid taking things personally!
As teachers, we tend to expect perfection in every lesson. When things go wrong, we quickly blame ourselves. While we do need to reflect on every lesson in order to maximise learning, we also need to remember that when children behave in a challenging manner, this doesn’t necessarily mean that they don’t like us or that we’ve done something wrong.
ü Avoid correcting every mistake!
We want our children to learn English successfully and efficiently. The problem is that they keep making mistakes. Correcting every mistake causes children to become hesitant and less inclined to join in. They then quickly realise that if they don’t say anything, the teacher won’t ’pick on’ them in front of the class. So, treat mistakes as if they were salt and pepper. Too little correction makes learning bland, but too much spoils the enjoyment. Only correct a mistake if it interferes with communication. If it doesn’t, jot it down and deal with it later.
ü Avoid explaining grammar!
Children are not yet capable of thinking abstractly. This means that they have trouble understanding grammar explanations. Rather than explaining grammar rules to children, teach them games or songs, which stay in their memory long after the lesson is over. Games and songs help them to pick up and practise the target language in a natural context while having fun.
ü Avoid the negative; mirror the positive!
As teachers, we often act as children’s role models. Children mirror the things we do and say. Thus, make a point of demonstrating positive examples like keeping the classroom tidy (with the children’s help). Remember to focus on why this is important and how it helps them learn better.
ü Avoid having teacher’s pets!
It is natural to have more of an affinity with some children than with others. The secret is to make sure that this remains your secret. Make sure that you treat everyone the same. Remember how sad and frustrating it is to not be chosen because you aren’t one of the teacher’s favourites.
ü Avoid changing things every day!
Resist the temptation to be overly creative, changing things every day. Remember that children like and need routine. Constant change makes it difficult for them to be well behaved because they are not sure what is expected of them. Remember that success feeds motivation!
ü Avoid doing or saying things only once!
Children take time to learn and not every child is able to get things right after just one quick instruction. This means that before you ask children to do something for you, you need to demonstrate exactly what it is that you want them to do, rather than just telling them. Always invite two or three children to have a go at the task or activity in front of the class before you hand it over to the children.
Ways to establish an exciting and purposeful learning environment
School can be something a child looks forward to or something they dread. To help ensure that the former is the case, here are some tips to help you make kids like school.
ü Get to know the children!
Children enjoy going to school when teachers meet both their academic and their emotional needs. This means that you need to find out more about your students. Begin by making an effort to speak to them both in and outside the classroom. By connecting with them, you will soon understand them and their needs, and this process is likely to reduce behaviour problems.
ü Let them get to know you as well as each other!
Invest time in allowing the children to get to know you as a person, and as a teacher. Share any personal details that you are comfortable with them knowing about. This will help create a special bond of trust between you. Invite the children to do pairwork and groupwork activities. These encourage them to get to know each other and develop social skills, which will have an impact on their working lives.
ü Decorate the classroom!
Make the classroom look attractive and friendly. Display the children’s work for everyone to see how good they are at learning English. To give the children more exposure to language, put up word cards that label the various objects and images in the classroom. Once they know a particular set of words, substitute them with new word cards to continue challenging the children.
ü Involve the parents!
Remember that the children’s parents are just as concerned about their children as you are. Involve them in the learning process by inviting them to come into the classroom, to speak about their own hobbies, interests and jobs. Hold a meeting at the beginning of the year to explain what the children will be doing in the English classroom and why. When parents understand the goings-on of the classroom, they become assets in the children’s learning process.
ü Create a time-out area!
We all have our individual work rhythms and personalities, which can mean that some children finish a task before the rest of the class. Certain children may even reject an activity on a ’bad-behaviour day’. Rather than initiate a confrontation, try providing these children with an alternative learning experience or activity like reading a story quietly in the reading corner or completing a worksheet.
ü Create a friendly classroom environment!
To create a friendly classroom environment, listen carefully to the children’s opinions of the tasks and activities being done. You’ll often find that they are able to come up with creative suggestions, which will help you engage them in class. Encourage them to respect each other’s opinions by including and regularly referring back to a rule in the Rules Poster like: «In our class we always listen to each other with our ears and hearts.»
ü Make learning relevant!
Remember that we learn better when what we are learning is relevant to our experiences, interests, personalities and ’realities’. When the content is abstract and theoretical, children tend to rote-learn it and then forget it. Focus on language they need in order to speak about the things in their lives; for example, family, food, pets, likes and dislikes, school, toys and games.
ü Set targets and celebrate achieving them!
Make successful learning objectives concrete for children by setting achievable objectives and targets. Negotiate three to five learning targets for the week with the children. Reward the class’s hard work and effort by celebrating when they achieve each target. This could mean playing the class’s favourite game or singing their favourite song at the end of that particular lesson, or even giving them a sweet as a special reward for their hard work.
ü Support children with special needs!
Remember to adapt general targets and objectives for children with special learning needs. Involve them in the process of defining their personal targets rather than simply presenting them with pre-defined targets. In many cases, they will know what they are capable of achieving better than you do, and if you have created a meaningful relationship with them, they will be motivated to tap into their ’super learning powers’ to please you. The results are often surprising and can set a great example for the class.
ü Create attendance and punctuality awareness!
Invest in promoting attendance and punctuality awareness. You can do this by being punctual for every lesson yourself, and by creating an attendance and punctuality chart, which a student fills in at the beginning of the lesson. Punctuality can then be objectively measured and rewarded.
Some ways to approach behaviour in the young learner classroom
Behaviour is a tricky issue in every classroom as it can make or break any lesson. The secret to keeping things under control is to approach behaviour management calmly and logically in order to avoid getting into emotional wars. Here are 10 behaviour management secrets that you may want to try.
ü Don’t take behaviour personally!
The first secret to managing behaviour is not to take it personally. Remember that the children are simply being children. Don’t forget that they will tend to mirror the behaviour and reactions that you have in class, so make sure that you always provide them with a positive role model to follow. Similarly, when telling children why their behaviour is not appropriate, explain that you are not against them, but rather the inappropriate behaviour, which you cannot accept.
ü Encourage the right choices!
Always present behaviour management as a choice that the children can make and then hold them accountable for their choices by kindly explaining the situation, e.g. ’Anya, when you choose to behave like that, you also choose to leave the game. If you change the way you are behaving and respect turn-taking, you will also choose to continue playing the game with us. So, what do you choose to do?’
ü Be consistent and coherent!
Before you start the school year, take some time to think about the rules and the type of behaviour that you find unacceptable. Then, calmly think about the consequences for less appropriate behaviour. Make sure that you discuss and agree upon different levels of consequences to match the severity and recurrence of inappropriate behaviour with the children: oral reprimand; time out; note home; class expulsion, visit to the headteacher’s office, etc.
ü Make a Rules Poster!
Involve the children in making a poster displaying 3-5 behaviour rules and make sure that they understand why each rule exists. Include rules related to topics like class noise, class materials, learning attitude, respect, etc. Once the behaviour for a rule is automatic, substitute that rule with another that still needs working on. Make sure that you follow a ’we’ model when making rules, for example, ’When we want to participate, we always put our hands up’. Include general headings before each rule to aid understanding: Noise Volume; Participation; Asking for Permission; Respecting and Listening to Others; Books and Materials.
ü Establish a positive classroom environment!
Get to know the children as individuals and not just as students. Learn their names as soon as you can by asking them to make personalised name cards. As you learn more about each child, you will slowly be able to earn their trust and have a personal and meaningful conversation with them.
ü Create a seating plan!
Creating a seating plan for each class will have a double effect: first, it will help you manage the class noise level and second, it will help you identify the children and learn their names quickly and efficiently so that you can quickly get their attention and avoid undesirable behaviour.
ü Create routines!
Routines are fundamental in any classroom as they show the children what you expect of them and make them feel safe. There are many routines that you can choose from: routines for the beginning and end of a lesson, routines for going to the toilet, routines for packing up, etc.
ü Keep the children busy, focused and on track!
Get the children busy from the minute they arrive. Have instructions on the board for them to follow as they walk into class. Train them to read the instructions and get on with their work. Write visual reminders of all tasks on the board in case they get lost during the lesson so that they can avoid unnecessary interruptions.
ü Keep moving!
Avoid standing still in one place for too long. Instead, move around the classroom and use your physical presence to encourage the children to stay focused and on track throughout the entire lesson.
ü Do positive reinforcements!
Instead of focusing on students who are misbehaving, shift your focus and pay most attention to the children who are behaving well, by saying things like, ’Class, look at Dmytryk! Look how neat his desk is and how his hand is up, waiting patiently for his turn!’
Useful routines for the young learner classroom
Routines help us to avoid behaviour problems and save valuable teaching and learning time by encouraging the children to become autonomous. In addition, they make children feel safe and get them into learning mode. However, routines have to be taught and practised over and over again before they become automatic. Here is a list of 9 routines that you can introduce in your classroom.
1 Getting the children into a learning frame of mind
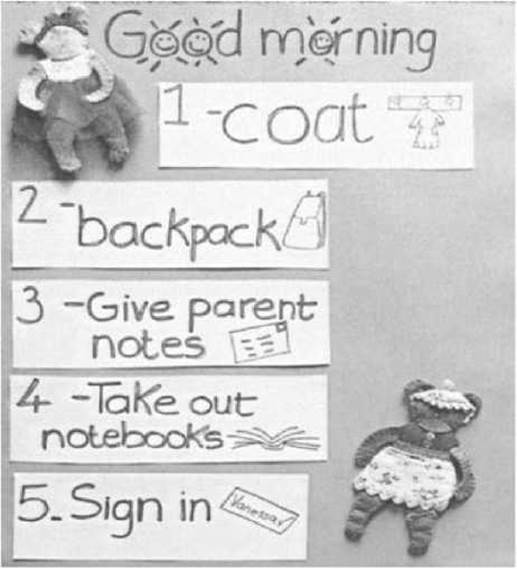
Get the children ready for learning before the lesson begins. Display a ’Good morning’ chart outside your classroom to tell children what you want them to do as soon as they enter the classroom. Use topics and key words on your chart to make sure that it’s clear and easy to understand.
2 Filling in classroom charts
After the children have entered the classroom, taken off their coats and put their bags away, get them to fill in the attendance chart with their ’avatar’. To create these at the beginning of term, give each child a blank cardboard cut-out of a boy or girl to decorate and write their name on. Each day when they arrive, they put their avatar on the ’At school’ section of the chart. Remember to get a helper to put all the avatars back in the ’At home’ section at the end of every lesson. Another possibility is to get the children to fill in a calendar and weather chart. These charts are great for introducing language in a communicative context.
3 Dealing with personal items
Develop the children’s sense of personal responsibility by teaching them how to take the initiative and look after their personal items. Hang up visual reminders in the classroom to remind them what their responsibilities are. Label the children’s hooks or cubbyholes with name cards in alphabetical order.
4 Singing a song
A song can be a very effective tool to signal a change of activity to children. Try using a hello song to start your lesson, a tidy-up song to signal the end of an activity and a goodbye song to end your lesson.
5 Choosing the teacher’s helper for the day
Implement a fair system to choose a teacher’s helper each day. Get the children to decorate a peg with their name on it. Hang the pegs on a piece of string. The first peg on the string is the teacher’s helper. Once a child has been the teacher’s helper, move the peg on the end of the string so that every child gets the chance to be a teacher’s helper.
6 Asking for permission
Implement a system in which you reduce the learning time children waste every day asking you for permission to go to the toilet or sharpen their pencils. Make a bathroom pass card for the boys and another for the girls. Hang the passes up next to the door. A child can go to the toilet if there is a pass available. You can also make pencil-sharpening passes that are hung next to the bin.
7 Getting the children’s attention
Avoid shouting to get the children’s attention. Instead, use a silent gesture like folding your arms and waiting patiently for the children to notice you, or clapping out a rhythm which the children echo back to you. Another option is to use a chant which the children respond to.
8 Forming groups
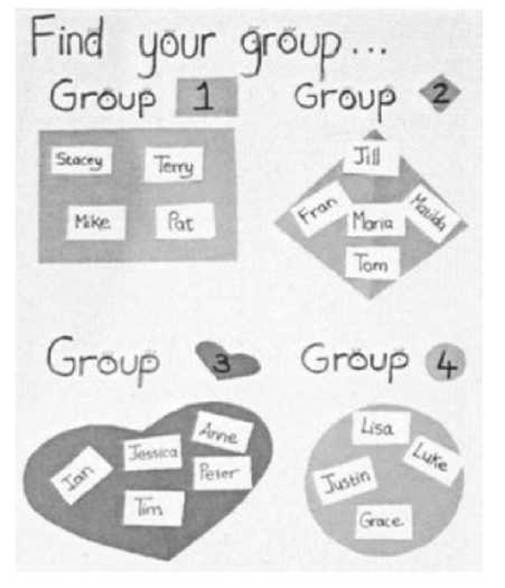
Organising groups can be a time-consuming activity. Reduce time spent on this by preparing a groupwork poster, which you display on the door before the lesson begins. As the children walk into the classroom, they see which group they belong to and automatically join it. Remember to give each group a name or a colour to make it easily identifiable.
9 Getting children’s feedback
End the lesson with a quick circle time discussion in which you get the children to think back over the activities they did during the lesson and to choose their favourite one. This feedback will help you plan your future lessons in a motivating and engaging way.
Useful tips for planning a young learner lesson
When planning your lesson, remember to think about the characteristics of young learners and how you can cater for them. A good lesson presents young learners with activities that respect their short attention span and lets them play and have fun while learning. Here are 10 tips to have you planning engaging lessons that are fun for everyone.
Include an opening routine
Routines make children feel safe by letting them know what is expected of them and how they can please you. Start your lesson with a routine to guarantee that every child begins your lesson on a positive footing. One possibility is to use a lively hello song that gets the children in a good English-learning frame of mind and sets the tone for your lesson. There are many great songs on YouTube that you can choose from. An alternative is to use a chant.
Plan a revision activity
Children need lots of revision to remember the language that they learn. To help them revise and practise language while having fun, start your lesson playing a game or singing a song that revises the language that they learned in the previous lesson.
Choose learning objectives for your lesson
Before you begin planning the tasks and activities for your lesson, take a step back and look at the bigger picture. Which general learning objectives do you want to work on in that particular lesson? Do you want to develop children’s self-study skills, their thinking skills, their intercultural knowledge or their imagination and creativity? This will help you choose the best language tasks and activities for your lesson. Remember to keep things within the children’s capabilities.
Determine the language and skills content of your lesson
Once you have decided on your learning objectives, ask yourself the following questions: (1) which skills and language do I want to teach them today: reading, writing, listening or speaking? and (2) do I want to teach new words or a new language function? Once you have determined the language and skills content of your lesson, choose tasks and activities which help the children to achieve that aim.
Include activities that change the pace of the lesson
As you choose activities for your lesson, make sure that you include a few stirrers and settlers to manage the children’s energy levels throughout the lesson. Remember to change activities approximately every 5-8 minutes in order to cater for children’s limited attention spans.
Limit your creativity
Teachers are often creative by nature, but be careful not to be too creative, as children may feel threatened by too much change in a lesson. When you choose tasks and activities for your lesson, remember to repeat task types and activity types. When they are doing a familiar task or activity, children have the opportunity to focus on and acquire new language. In this way, learning English is safe and achievable for everyone.
Plan for success
Learning a language is difficult. To keep your children motivated, make them feel like they are succeeding and progressing in every lesson. Plan to include at least one confidence-boosting familiar activity in every lesson, one at which you know the children will succeed. This will give you the opportunity to praise and reward their success!
Follow a PPP (Presentation, Practice, Production) model
One way to structure your lesson is to follow a PPP model of learning. Start off by presenting new language to the children. Then choose a controlled activity such as a drill, which helps the children practise the language in a safe context. As the language becomes automatic, allow them to start experimenting and playing with that language. A 45-minute lesson plan may be structured as follows:
1 lesson routine and revision activity: 10 minutes
2 presentation of new language in context: 10 minutes
3 controlled practice activities: 15 minutes
4 a freer practice activity: 5 minutes
5 closing routine and self-evaluation: 5 minutes
Plan for variety
Your students won’t always respond in the same way to different activities, so try to vary the lesson to suit everyone. For example, include a song or a chant, a flashcard activity and games with lots of movement so students aren’t always in their seats.
Plan student-centred lessons
Centre your lesson around your students. Let them speak and play with English in class. Remember that they should be the stars of the lesson and not you. Teachers should be guiders and facilitators of learning rather than dictators who dominate the majority of the lesson time.
Activities for your first lesson
The way that you begin your first lesson is very important and will set the tone for the rest of the year. Because first impressions really do count, make sure that you create a positive impact on your students. Here are 10 activities that will help you do that.
1 ’Simon says’ getting-to-know-you game
A simple way to start the year while allowing the children to have fun and get to know each other is by playing ’Simon says’. Organise the children in two rows on opposite ends of the room so that they can all see each other. Stand in the middle and give instructions like ’Simon says hop on one foot if your favourite colour is green.’ After a while, try to catch children out by leaving out the ’Simon says’ part of the instruction. If a child follows the instruction, he or she is ’out’. An easy follow-up activity is to count and record the children’s answers/reactions on the board and get them to make a class fact file about themselves to display in the classroom.
2 Ball game
For a fun way to learn each other’s names, stand the children in a circle. Start off by getting a child to introduce him herself (e.g. ’Hi, I’m Oksana’), and to pass the ball to the child on the right. The second student repeats the first student’s name, and adds his or her own name (e.g. ’She’s Oksana and I’m Ivanko’). Start a new chain after about eight names, as it becomes too cognitively challenging for children to remember more than that. Once everyone has said their name, throw a ball to a child and say that child’s name. The child who catches the ball continues the game. To make the game more challenging, introduce a speed factor.
3 ’Find someone who …’ bingo game
Prepare a bingo card with a short ’Find someone who ...’ instruction for each square, for example, ’Find someone who has got a pet’. Make sure that you include an instruction which you think only applies to you so that you encourage the children to interact with you from the very beginning. Hand out the cards to the children. Encourage the children to mingle and speak to each other to find a different name to write in each square. When they have a vertical or horizontal line, they should shout out, ’Bingo!’ Follow up the activity with a chat about the things they have discovered about each other.
4 Spin the bottle
Get the children to sit in a circle with a bottle in the middle. Fill it with a small amount of sand to give it some weight. Spin the bottle. When it stops, establish which student it is pointing to. Find out their name and ask them a simple question such as ’What’s your favourite colour?’ Continue the game by inviting that child to spin the bottle and ask the next question.
5 Something you don’t know about me
Give each student a slip of paper. On it, they write their name and something about themselves that nobody knows yet (for example, a place they have been to or something they like doing). Collect and mix the slips of paper. Then choose one of the slips. Pick three students, one of whom must be the child who wrote the fact you have chosen. The three children stand outside the classroom and read the slip. They prepare their ’claim’ to the secret. When they come back in, the class should ask each of the three children three questions to discover who the true owner of the fact is.
6 Snowball fight
Give each child a sheet of recycled paper. They write their names and five things about themselves on it and scrunch it up into a paper snowball. Divide the class into two teams and organise them so that they are standing facing each other at opposite ends of the classroom. When you shout ’Snowball fight!’, the children throw their snowballs at each other. Each child picks up or catches a snowball and goes up to the originator. The ’finder’ of the snowball presents their new friend to the class with the information they have discovered.
7 Find your sticker friend
A variation of the activity above is to give each child a sticker as they walk into class. Make sure that you have enough matching pairs of stickers for all your students. Play some music and get the children to find their matching ’sticker friend’. Have prompts on the board to help the children interview and present their partner to the class.
8 My special box
Bring a cardboard box into class containing objects and photos that mean something to you. Show the children one item at a time and answer any questions the children may have. Follow the activity up by getting the children to make special boxes of their own, which they can present in a show-and-tell session.
9 ’This is me’ worksheet
This is a great activity for children who don’t know how to write yet. Give the children a worksheet entitled ’This is me!’ The children write their name and draw some of their favourite things on it. Put up the children’s pictures in an exhibition corner and encourage the children to visit each other’s profiles.
10 Make a ’class rules’ poster
Classroom management starts on day one. Involve the children in the goings-on of the class by getting them to think about how they would like to work and learn together. Start with a discussion about what the behaviour rules should be for both the teacher and the student so that learning English is fun for everyone. Then create a poster with five rules that everyone agrees on, which the children can help you make and decorate.
Thoughts on instructions
Instructions can make or break a lesson. If children understand what you want them to do, they will be able to meet your expectations and the lesson will run smoothly. However, if instructions are confusing, chaos and confusion may ensue, requiring a lot of your time and effort to get things back under control. To get some ideas on how to give effective instructions, have a look at the tips below.
ü Plan instructions!
Instructions are fundamental in the classroom, so spend time carefully planning the instructions that you give. As you plan the activities for your lesson, think of and plan the corresponding instructions that you will need for a particular activity. This may initially appear time-consuming, but it will save you and the children a lot of stress in the classroom.
ü Keep instructions short and simple!
Keep your instructions short, simple and to the point. Remember that children have a short attention span and are eager to get going on a task. So, if your instructions are long and complicated, they are likely to switch off or forget everything that you have said, even before they start doing anything.
ü Word instructions positively!
Make sure that your instructions tell the children what you want them to do rather than what you don’t want them to do. They should be in the affirmative form. For example, instead of saying, ’Don’t shout!’, try saying, ’Speak quietly.’
ü Sequence instructions!
Give instructions in a sequenced manner. Follow a 1-2-3 approach to giving instructions: First open your books, then read the story, and finally do Exercise 1. Write this on the board in three steps, numbered 1, 2 and 3, so that the children can go back to the instructions if they forget them as they become immersed in the activity.
ü Repeat instructions!
Make sure you give instructions more than once. Children have different learning rhythms and language levels, which will mean that they don’t all understand you at the same time. Some children may need to hear an instruction several times before they understand what you want them to do.
ü Demonstrate instructions!
Remember that young learners still have a very basic command of English. To avoid misunderstandings, give children instructions while demonstrating exactly what you want them to do. Think of yourself as a mirror, constantly reflecting what you want the children to do.
ü Check understanding!
Once you have given an instruction, take the time to check whether the children have understood. Don’t limit yourself to asking, ’Do you understand?’ The natural answer to this question tends to be ’Yes’. Try getting the children to repeat the instruction back to you like a parrot or in a parrot voice. This will allow them to have fun and stay on track at the same time.
ü Give instructions in English!
Avoid using the children’s native language to give instructions. Instructions are a natural and communicative opportunity for children to pick up and learn new language. Remember that children need as much exposure to English as they can get.
ü Make instructions visual!
Children respond well to visual stimuli. This means that they tend to remember what they see rather than what they hear or are told to do. Make cards with an instruction and an illustrative image on each. Show the children these cards as you give them the instructions.
ü Give instructions on a need-to-know basis!
Avoid bombarding children with a long list of instructions. By the time you get to the end, they will probably have forgotten what you wanted them to do first. Instead, give them instructions for a particular activity on a need-to-know basis. This means that the children are given time to complete each task before being given the next instruction.
Ways to start and end lessons
The way you start and end a lesson is important. At the beginning of the lesson, you need to warm the children up for what they are about to learn, and at the end, you need to give them ’closure’ on what they have learned. The first four activities are warmers to help you start your lessons effectively. Activities 5-8 are coolers; these will help you bring your lesson to a close.
► Meet and greet at the door
У Treat the children like guests that are visiting your home and meet and greet them at the classroom door. This will help you bond with the children and show them that you care about them. You can also end your lesson by saying goodbye to each child at the door. When you do this, try saying something positive about what each child has done in that particular lesson, for example, ’Maria, I really liked the way you pronounced ’teacher’ today! I What a star you are!’ Make sure that the feedback you give is genuine.
► Define learning objectives
Start your lesson by giving the children a learning map of what is going to happen in that lesson. Define and discuss 3-5 learning objectives with the children for that lesson, for example, ’Today we are going to learn eight new words about farm animals. We are also going to learn how to say these words properly in English. Then we are going to write a sentence about our favourite farm animal and illustrate it.’ Write these objectives in the top right-hand corner of the board. Come back to them throughout the lesson and tick them off as you achieve them. This will give the children a sense of progression of the lesson and allow them to see how well they are learning in your class.
► Sing a familiar song or say a chant
You can signal to the children that your lesson has begun by singing a familiar song or getting them to say a routine chant. To make the activity more challenging, try getting the children to say it faster and faster each time or to repeat it using a different voice, for example, ’This time, let’s say our chant in a happy voice.’ Good voices to use are ones showing different emotions such as happy, sad, hungry, tired, disappointed, or character voices, for example, a princess, a dragon, a witch or a monster.
► Challenge of the day
Start your lesson by writing a riddle on the board for the children to solve. An example might be, ’What has got a face and two hands but no arms or legs?’ (Answer: a clock.) This will challenge children from the minute they walk through the door. As the children get better at solving these challenges, they can come up with their own for the class to solve next time.
► Revision activity: quiz game
A fun way to end your lesson is to get the children to play a game that encourages them to remember and practise what they have learned. Jeopardy is a quiz game in which the children pick a box and answer a question in order to win the amount of money displayed on the box. The lower the value, the easier the question. The winner is the player/team with the most money at the end.
► ’What have you learned today?’ discussion
Children love puppets. A fun way to end the lesson is to get the children to sit in a big circle and to encourage them to tell the class puppet what they can remember about that lesson. You can help them by referring back to the lesson objectives on the board. This is also a great way of finding out what your children enjoyed and getting feedback about your lesson.
✵ Goodbye song
You can end your lesson with a routine that involves singing a familiar goodbye song, for example:
Goodbye, Goodbye
It’s time to go!
Hurry up, Hurry up,
It’s time to tidy up!
Goodbye, Goodbye
See you soon!
Goodbye, Goodbye
See you soon!
There are countless songs to choose from on YouTube. Remember to choose one that is simple and repetitive so that it’s quick and easy to learn.
► Awards ceremony
End on a high by having a short awards ceremony at the end of the lesson. You could give rewards for the hardest worker, the most helpful student or the neatest handwriting. The winner can wear a badge or be the teacher’s helper in the next lesson.
Ways to use stirrers and settlers
Children have a short attention span, so it’s important to make sure that you monitor their energy in the classroom to prevent them from getting too excited or too bored. To keep them focused and on track, make sure that the activities you choose are short, and that you pace your lesson well by including various stirrers and settlers in your plan. Stirrers are activities that are designed to get children excited and allow them to use up their energy by getting them to move around. Settlers have the opposite effect. They are designed to get children to calm down after a stirrer and into a quieter frame of mind for the next activity. Below is a list of 9 stirrers and settlers that you can try out in your classroom.
ü Play a ball game!
This is a stirrer in which the children play a game that helps them practise the target language and move around. A simple idea is to play a ball game. Introduce a vocabulary topic, e.g. clothes. The children stand in a circle and throw a ball to each other. The child who catches the ball has to say a word belonging to that particular word set, e.g. ’skirt’. To adapt the activity for weaker learners, allow them to repeat the words that they’ve heard.
ü Play a flashcard mingling game!
Choose a topic. Distribute a set of flashcards or word cards related to that topic to the children. Each child then sticks their flashcard or word card on another child’s back without that child seeing what is on it. The children then move around the room asking each other questions to guess who they are.
ü Conduct a survey!
Invite the children to move around the room conducting a class survey relating to a topic that you are teaching, for example, ’What’s your favourite food?’ Then get the children to make a pie chart poster with their survey results.
ü Sing a song or chant!
Start singing a song or chant that the children have already learned, for example, ’If you’re happy and you know it’. Then sing it faster and faster to stir things up. The children will soon be out of breath and ready for your next activity.
ü Use a routine activity!
This activity works well as a settler. Help the children to calm down by triggering a familiar routine that the children are used to. You could sing a song they already know or do a simple yoga breathing exercise.
ü Play sorting games!
Try a categorising activity in which you give the class 12 random words they have already learned, which they have to organise into lexical sets. To begin with, give the children the lexical set categories to guide them. As they become used to this type of exercise, encourage them to come up with the categories themselves.
ü Read and draw!
Read out a short, simple descriptive text and get the children to draw a picture of what they hear. Once they have drawn their pictures, follow up the activity by getting them to write one or two short sentences about their picture.
ü Alternate your lesson activities with a story!
Give the children some time out by reading them a story between activities. With larger classes, photocopy and enlarge the main images of the story and put them up on the board as you read.
ü Plan for individual activity time!
Remember that we all like a breather every now and then, so plan a quiet moment in every lesson when the children can stop and draw a picture or do a simple arts and crafts activity.
9 key resources for your teacher toolkit
As teachers, we have to be ready for anything that may happen during a lesson. This inevitably means that we need to be flexible and adapt our lesson plan, whenever necessary, to meet our students’ needs. A well-equipped toolkit will help us do that. Here are 9 key resources to help you stock up.
1 Flashcards/word cards, posters, realia
Flashcards help to make learning visual, and make the meaning clear for learners. They also allow them to have fun and play games to drill new vocabulary. So make sure you have a complete set. You may also want to include a set of corresponding word cards and a few posters too. Don’t forget to take along some poster tacks or magnets to put everything up on the board. An alternative to flashcards is realia, which is perfect for drama activities or games.

2 ’Classroom language’ cards
A set of ’classroom language’ cards will also save you time and help avoid confusion in the classroom. They will help you give instructions in English and expose children to language in context, which they will soon pick up. The following signs are useful: ’Quiet’, ’Time to clean up’, ’Look and listen’, ’Please raise your hand’ and ’Please line up’.
3 Noisemaker
A noisemaker, like a tambourine or a bell, will help the children realise that you need them to focus and have their eyes on you. This will save you raising your voice.
4 Puppets
Puppets transport children to imaginary worlds. They also encourage shy children to speak up by giving them a ’crutch’. Additionally, they can be a classroom management tool by whispering secrets like Tm getting earache. It’s too noisy!’ to you. A set of finger puppets of the main characters in your course book will help the children practise speaking skills by role-playing the stories and dialogues they read.
5 Arts and crafts materials
Make sure that your teacher kit has lots of plain white and coloured paper, pens, crayons and markers, and perhaps some modelling clay for children to make their own learning materials or a bingo card to fill up those extra five minutes that you hadn’t planned for.
6 Mini-whiteboards
A cheap set of mini-whiteboards is an invaluable tool in your teacher kit. Ideally, have one per child to play spelling games, ’Identify the flashcard’ games, ’What’s the odd word out?’, etc., which help you see evidence of learning for each child.
7 A games kit
Children love games, so no teacher should be without a games kit. Make sure that you have a dice and some counters (at least one set per group) to play board games. It’s also useful to have a big class copy of games that can be adapted to any unit you are teaching, for example, a set of bingo cards, a big noughts-and-crosses card or a giant Jeopardy board.
8 Letter formation worksheets
If you are teaching younger learners, this is a tool that will make your and their lives much easier. Remember to include a set of handwriting/letter formation worksheets for less advanced students and one for more advanced students. Although most course books have some handwriting letter formation practice, this is usually not enough to get every child to develop their writing skills to the point that they can write quickly and confidently.
9 Teacher diary
It is important to have a little something for yourself, too; something that will help you reflect on your teaching practice so that you can rise to the occasion and make a difference. This is why you need a teacher diary or blog to record the most important things that happen in class so that you can reflect on them calmly and critically afterwards. It is useful for you to write about what didn’t go as well as you hoped, but it is just as important to write about what went well so that in future you can include activities in your lesson plan which appeal to the characteristics and needs of the children you are teaching.